Raspberry Pi + Rune Audio ::: Một trải nghiệm nghe nhạc mới

binna

Well-Known Member
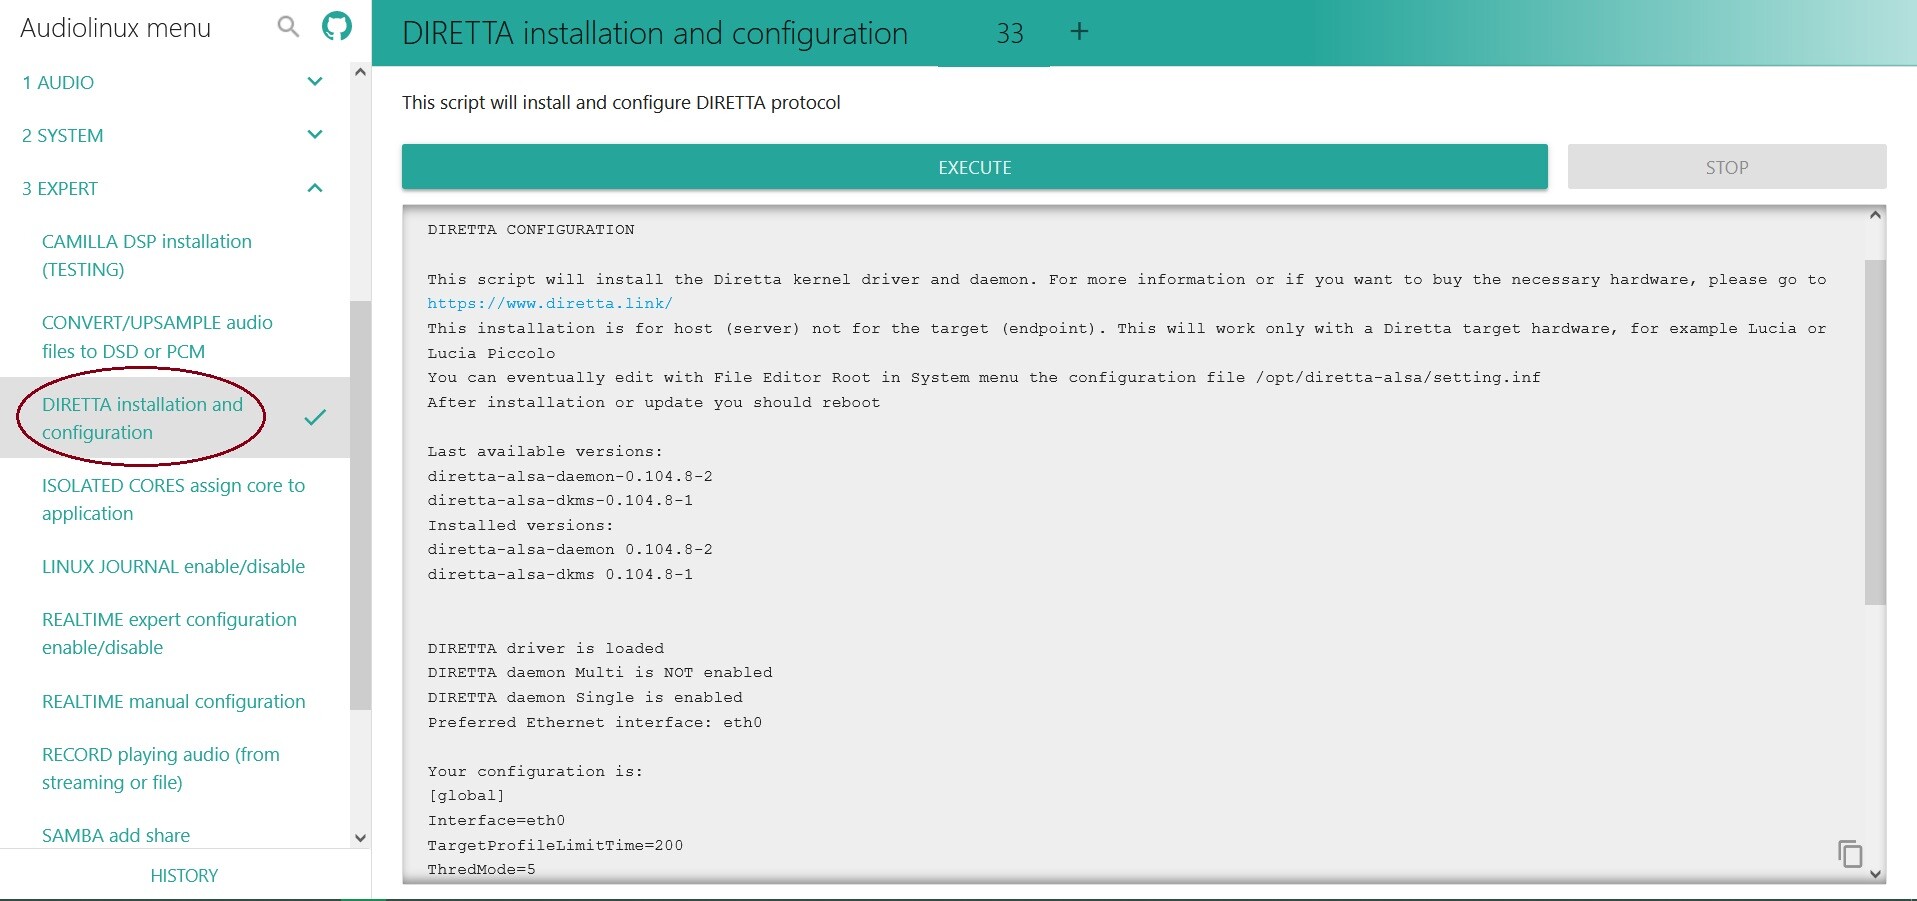
Hiện tại (Theo em đã test) có 3 cách để setup VPN server ạ:

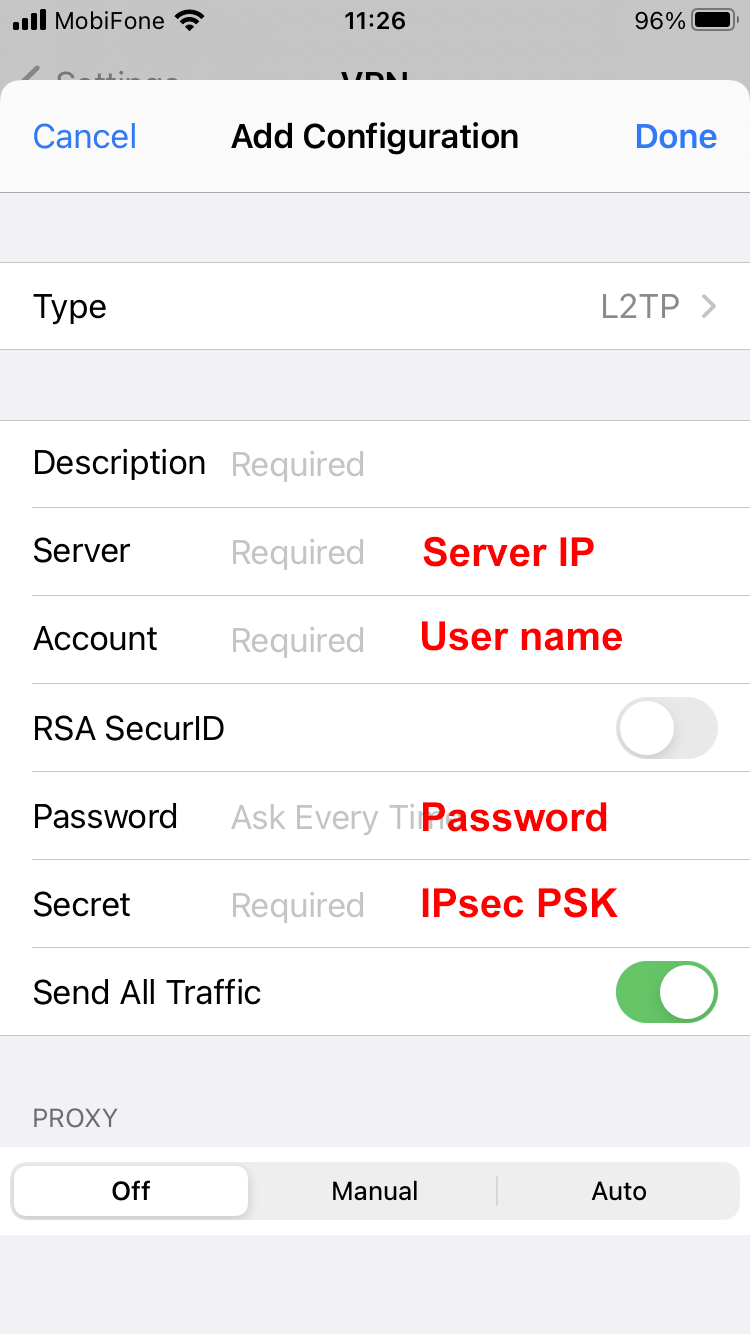
- l2tp/ipsec. Cái này cài dễ nhất:

https://github.com/hwdsl2/setup-ipsec-vpn

Mã:
sudo apt-get update && sudo apt-get dist-upgrade -y
sudo reboot
wget https://git.io/vpnsetup -qO vpn.sh && sudo sh vpn.sh
em chạy dòng lệnh trên, nó ra được cái này.... giờ sao nữa bác ui
Server IP: 152.xxx.xxx.xxx
IPsec PSK: Vo3mDqkmk7K97HpqHESA
Username: vpnuser
Password: HLahEXYbR7MzUN62
 

linh0983

Well-Known Member
Cái máy dùng 110v hơi yếu (cự ly thấp) tôi khoái chú này Lâm a . :eek:
https://meta.vn/may-khoan-ban-350w-tolsen-79650-13mm-p62487

may-khoan-ban-350w-tolsen-79650-13mm.jpg
 

tml3nr

Moderator
em chạy dòng lệnh trên, nó ra được cái này.... giờ sao nữa bác ui
Server IP: 152.xxx.xxx.xxx
IPsec PSK: Vo3mDqkmk7K97HpqHESA
Username: vpnuser
Password: HLahEXYbR7MzUN62
Vậy là nó đã setup xong. Anh có thể dùng được rồi.

Đó là thông số để kết nối vpn l2tp/ipsec.

Có 2 loại vpn l2tp. Có và không có ipsec.

Loại không có ipsec chỉ cần server / user và pass.

Loại ipsec cần phải có thêm PSK.

Thí dụ như IOS chỉ chấp nhận l2tp ipsec.

Mấy router Asus bình dân chỉ chấp nhận l2tp không ipsec (Không có chổ nhập PSK).

Khai báo l2tp có ipsec:

ios-ipsec.png


Khai báo l2tp không có ipsec:

router-l2tp-non-ipsec.png

More info:

https://hdvietnam.org/posts/10796144/
 
Chỉnh sửa lần cuối:

binna

Well-Known Member
Vậy là nó đã setup xong. Anh có thể dùng được rồi.

Đó là thông số để kết nối vpn l2tp/ipsec.

Có 2 loại vpn l2tp. Có và không có ipsec.

Loại không có ipsec chỉ cần server / user và pass.

Loại ipsec cần phải có thêm PSK.

Thí dụ như IOS chỉ chấp nhận l2tp ipsec.

Mấy router Asus bình dân chỉ chấp nhận l2tp không ipsec (Không có chổ nhập PSK).

Khai báo l2tp có ipsec:

ios-ipsec.png


Khai báo l2tp không có ipsec:

router-l2tp-non-ipsec.png

More info:

https://hdvietnam.org/posts/10796144/
cảm ơn bác đã hỗ trợ nhiệt tình.... VPN chạy được rồi ạ
 

toi511

Well-Known Member
Vậy là nó đã setup xong. Anh có thể dùng được rồi.

Đó là thông số để kết nối vpn l2tp/ipsec.

Có 2 loại vpn l2tp. Có và không có ipsec.

Loại không có ipsec chỉ cần server / user và pass.

Loại ipsec cần phải có thêm PSK.

Thí dụ như IOS chỉ chấp nhận l2tp ipsec.

Mấy router Asus bình dân chỉ chấp nhận l2tp không ipsec (Không có chổ nhập PSK).

Khai báo l2tp có ipsec:

ios-ipsec.png


Khai báo l2tp không có ipsec:

router-l2tp-non-ipsec.png

More info:

https://hdvietnam.org/posts/10796144/
Mình cài xong máy ảo rồi, giờ làm gì nữa anh. Trên trang anh để link thấy hướng dẫn cài vpn server docker gì đấy. Nó có khác mấy cái của anh không. Em làm cách 2 của anh mà chưa được loằng ngoằng quá. Non ipsec gì đấy
 

tml3nr

Moderator
Mình cài xong máy ảo rồi, giờ làm gì nữa anh. Trên trang anh để link thấy hướng dẫn cài vpn server docker gì đấy. Nó có khác mấy cái của anh không. Em làm cách 2 của anh mà chưa được loằng ngoằng quá. Non ipsec gì đấy
Anh chờ tí em rảnh sẽ viết rõ hơn về cách cài l2tp không ipsec nhé. Tút đó viết hơi thiếu nên phải làm thêm vài bước nữa.

Anh nhớ tạo OS là ubuntu. Mấy cái khác hơi khó dùng.

Chổ Security nên chọn All Protocol cho dễ test:

https://thuanbui.me/cau-hinh-vps-mien-phi-oracle-cloud/

Vì không thích Java nên em không thích dùng Docker. Cố tránh nó tối đa ạ. Hết cách mới phải dùng nó.
 
Chỉnh sửa lần cuối:

tml3nr

Moderator
Mình cài xong máy ảo rồi, giờ làm gì nữa anh. Trên trang anh để link thấy hướng dẫn cài vpn server docker gì đấy. Nó có khác mấy cái của anh không. Em làm cách 2 của anh mà chưa được loằng ngoằng quá. Non ipsec gì đấy
Em viết lại tút cài l2tp không ipsec ạ.

Bài gốc ở đây:

https://smekkley.wordpress.com/tag/l2tp-without-ipsec/

Chổ nào chưa rõ các anh cho em biết nhé.

Bước 1:

Mã:
sudo apt-get update && sudo apt-get dist-upgrade -y

sudo reboot

sudo apt-get install xl2tpd

Bước 2:

Mã:
sudo nano /etc/xl2tpd/xl2tpd.conf

Edit như sau:

Mã:
[global]
port = 1701

[lns default]
ip range = 192.168.42.10-192.168.42.250
local ip = 192.168.42.1
require chap = yes
refuse pap = yes
require authentication = yes
name = l2tpd
pppoptfile = /etc/ppp/options.xl2tpd
length bit = yes

Bước 3:

Mã:
sudo nano /etc/ppp/options.xl2tpd

Edit như sau:

Mã:
ipcp-accept-local
ipcp-accept-remote
ms-dns 8.8.8.8
ms-dns 8.8.4.4
noccp
auth
mtu 1410
mru 1410
proxyarp
connect-delay 5000

Bước 4:

Mã:
sudo nano /etc/ppp/chap-secrets

Edit như sau:

Mã:
# Secrets for authentication using CHAP
# client   server   secret           IP addresses
"vpnuser"   l2tpd   "123456"       *

Bước 5:

Mã:
sudo nano /etc/iptables/rules.v4

Remove các dòng sau:

Mã:
-A INPUT -j REJECT --reject-with icmp-host-prohibited
-A FORWARD -j REJECT --reject-with icmp-host-prohibited

Thêm vào các dòng sau:

Mã:
*nat
:PREROUTING ACCEPT [0:0]
:INPUT ACCEPT [0:0]
:OUTPUT ACCEPT [0:0]
:POSTROUTING ACCEPT [0:0]
-A POSTROUTING -s 192.168.42.0/24 -o XXXX -j MASQUERADE
-A POSTROUTING -o XXXX -j MASQUERADE
-A POSTROUTING -o ppp0 -j MASQUERADE
COMMIT

Trong đoạn *filter / COMMIT thêm vào dòng sau:

Mã:
-A INPUT -p udp --sport 123 -j ACCEPT

Ghi chú:

XXXX là interface của eth0. Mình xem bằng lệnh "ip address show". Như bên dưới nó là ens3:

Mã:
ubuntu@tml3nr-e2:~$ ip address show
1: lo: <LOOPBACK,UP,LOWER_UP> mtu 65536 qdisc noqueue state UNKNOWN group default qlen 1000
    link/loopback 00:00:00:00:00:00 brd 00:00:00:00:00:00
    inet 127.0.0.1/8 scope host lo
       valid_lft forever preferred_lft forever
    inet6 ::1/128 scope host
       valid_lft forever preferred_lft forever
2: ens3: <BROADCAST,MULTICAST,UP,LOWER_UP> mtu 9000 qdisc pfifo_fast state UP group default qlen 1000
    link/ether xx:xx:xx:xx:xx:xx brd ff:ff:ff:ff:ff:ff
    altname enp0s3
    inet 10.0.0.123/24 brd 10.0.0.255 scope global ens3
       valid_lft forever preferred_lft forever
    inet6 fe80::xxxx:xxxx:xxxx/64 scope link
       valid_lft forever preferred_lft forever
15: ppp0: <POINTOPOINT,MULTICAST,NOARP,UP,LOWER_UP> mtu 1280 qdisc fq_codel state UNKNOWN group default qlen 3
    link/ppp
    inet 192.168.42.1 peer 192.168.42.11/32 scope global ppp0
       valid_lft forever preferred_lft forever

Sau đó chạy lệnh:

Mã:
sudo iptables-restore < /etc/iptables/rules.v4

Bước 6:

Mã:
sudo nano /etc/sysctl.conf

Thêm vào:

Mã:
net.ipv4.ip_forward=1

Sau đó:

Mã:
sudo sysctl -p

Bước 7:

Mã:
sudo systemctl restart xl2tpd

Vậy là xong rồi ạ. Mình đã có 1 cái VPN không ipsec.

User là vpnuser

Password là 123456.
 
Chỉnh sửa lần cuối:

toi511

Well-Known Member
Em viết lại tút cài l2tp không ipsec ạ.

Bài gốc ở đây:

https://smekkley.wordpress.com/tag/l2tp-without-ipsec/

Chổ nào chưa rõ các anh cho em biết nhé.

Bước 1:

Mã:
sudo apt-get update && sudo apt-get dist-upgrade -y

sudo reboot

sudo apt-get install xl2tpd

Bước 2:

Mã:
sudo nano /etc/xl2tpd/xl2tpd.conf

Edit như sau:

Mã:
[global]
port = 1701

[lns default]
ip range = 192.168.42.10-192.168.42.250
local ip = 192.168.42.1
require chap = yes
refuse pap = yes
require authentication = yes
name = l2tpd
pppoptfile = /etc/ppp/options.xl2tpd
length bit = yes

Bước 3:

Mã:
sudo nano /etc/ppp/options.xl2tpd

Edit như sau:

Mã:
+mschap-v2
ipcp-accept-local
ipcp-accept-remote
noccp
auth
mtu 1280
mru 1280
proxyarp
lcp-echo-failure 4
lcp-echo-interval 30
connect-delay 5000
ms-dns 8.8.8.8
ms-dns 8.8.4.4

Bước 4:

Mã:
sudo nano /etc/ppp/chap-secrets

Edit như sau:

Mã:
# Secrets for authentication using CHAP
# client   server   secret           IP addresses
"vpnuser"   l2tpd   "123456"       *

Bước 5:

Mã:
sudo nano /etc/iptables/rules.v4

Remove các dòng sau:

Mã:
-A INPUT -j REJECT --reject-with icmp-host-prohibited
-A FORWARD -j REJECT --reject-with icmp-host-prohibited

Thêm vào các dòng sau:

Mã:
*nat
:PREROUTING ACCEPT [0:0]
:INPUT ACCEPT [0:0]
:OUTPUT ACCEPT [0:0]
:POSTROUTING ACCEPT [0:0]
-A POSTROUTING -s 192.168.42.0/24 -o XXXX -j MASQUERADE
-A POSTROUTING -o XXXX -j MASQUERADE
-A POSTROUTING -o ppp0 -j MASQUERADE
COMMIT

Ghi chú:

XXXX là interface của eth0. Mình xem bằng lệnh "ip address show". Như bên dưới nó là ens3:

Mã:
ubuntu@tml3nr-e2:~$ ip address show
1: lo: <LOOPBACK,UP,LOWER_UP> mtu 65536 qdisc noqueue state UNKNOWN group default qlen 1000
    link/loopback 00:00:00:00:00:00 brd 00:00:00:00:00:00
    inet 127.0.0.1/8 scope host lo
       valid_lft forever preferred_lft forever
    inet6 ::1/128 scope host
       valid_lft forever preferred_lft forever
2: ens3: <BROADCAST,MULTICAST,UP,LOWER_UP> mtu 9000 qdisc pfifo_fast state UP group default qlen 1000
    link/ether xx:xx:xx:xx:xx:xx brd ff:ff:ff:ff:ff:ff
    altname enp0s3
    inet 10.0.0.123/24 brd 10.0.0.255 scope global ens3
       valid_lft forever preferred_lft forever
    inet6 fe80::xxxx:xxxx:xxxx/64 scope link
       valid_lft forever preferred_lft forever
15: ppp0: <POINTOPOINT,MULTICAST,NOARP,UP,LOWER_UP> mtu 1280 qdisc fq_codel state UNKNOWN group default qlen 3
    link/ppp
    inet 192.168.42.1 peer 192.168.42.11/32 scope global ppp0
       valid_lft forever preferred_lft forever

Sau đó chạy lệnh:

Mã:
sudo iptables-restore < /etc/iptables/rules.v4

Bước 6:

Mã:
sudo nano /etc/sysctl.conf

Thêm vào:

Mã:
net.ipv4.ip_forward=1

Sau đó:

Mã:
sudo sysctl -p

Bước 7:

Mã:
sudo systemctl restart xl2tpd

Vậy là xong rồi ạ. Mình đã có 1 cái VPN không ipsec.

User là vpnuser

Password là 123456.
Xxx có hai cái nhập cái nào anh. Cảm ơn anh
 

tml3nr

Moderator
chờ tút của bác cho non ipsec

Xxx có hai cái nhập cái nào anh. Cảm ơn anh
Em mới cập nhật thêm một việc ở Bước 5 ạ. Các anh chịu khó xem lại bài trên nhé.

Các anh tham khảo file /etc/iptables/rules.v4 của em:

Mã:
# CLOUD_IMG: This file was created/modified by the Cloud Image build process
# iptables configuration for Oracle Cloud Infrastructure

# See the Oracle-Provided Images section in the Oracle Cloud Infrastructure
# documentation for security impact of modifying or removing these rule

*filter
:INPUT ACCEPT [0:0]
:FORWARD ACCEPT [0:0]
:OUTPUT ACCEPT [0:0]
:InstanceServices - [0:0]
-A INPUT -m state --state RELATED,ESTABLISHED -j ACCEPT
-A INPUT -p icmp -j ACCEPT
-A INPUT -i lo -j ACCEPT
-A INPUT -p udp --sport 123 -j ACCEPT
-A INPUT -p tcp -m state --state NEW -m tcp --dport 22 -j ACCEPT
-A OUTPUT -d 169.254.0.0/16 -j InstanceServices
-A InstanceServices -d 169.254.0.2/32 -p tcp -m owner --uid-owner 0 -m tcp --dport 3260 -m comment --comment "See the Oracle-Provided Images section in the Oracle Cloud Infrastructure documentation for security impact of modifying or removing this rule" -j ACCEPT
-A InstanceServices -d 169.254.2.0/24 -p tcp -m owner --uid-owner 0 -m tcp --dport 3260 -m comment --comment "See the Oracle-Provided Images section in the Oracle Cloud Infrastructure documentation for security impact of modifying or removing this rule" -j ACCEPT
-A InstanceServices -d 169.254.4.0/24 -p tcp -m owner --uid-owner 0 -m tcp --dport 3260 -m comment --comment "See the Oracle-Provided Images section in the Oracle Cloud Infrastructure documentation for security impact of modifying or removing this rule" -j ACCEPT
-A InstanceServices -d 169.254.5.0/24 -p tcp -m owner --uid-owner 0 -m tcp --dport 3260 -m comment --comment "See the Oracle-Provided Images section in the Oracle Cloud Infrastructure documentation for security impact of modifying or removing this rule" -j ACCEPT
-A InstanceServices -d 169.254.0.2/32 -p tcp -m tcp --dport 80 -m comment --comment "See the Oracle-Provided Images section in the Oracle Cloud Infrastructure documentation for security impact of modifying or removing this rule" -j ACCEPT
-A InstanceServices -d 169.254.169.254/32 -p udp -m udp --dport 53 -m comment --comment "See the Oracle-Provided Images section in the Oracle Cloud Infrastructure documentation for security impact of modifying or removing this rule" -j ACCEPT
-A InstanceServices -d 169.254.169.254/32 -p tcp -m tcp --dport 53 -m comment --comment "See the Oracle-Provided Images section in the Oracle Cloud Infrastructure documentation for security impact of modifying or removing this rule" -j ACCEPT
-A InstanceServices -d 169.254.0.3/32 -p tcp -m owner --uid-owner 0 -m tcp --dport 80 -m comment --comment "See the Oracle-Provided Images section in the Oracle Cloud Infrastructure documentation for security impact of modifying or removing this rule" -j ACCEPT
-A InstanceServices -d 169.254.0.4/32 -p tcp -m tcp --dport 80 -m comment --comment "See the Oracle-Provided Images section in the Oracle Cloud Infrastructure documentation for security impact of modifying or removing this rule" -j ACCEPT
-A InstanceServices -d 169.254.169.254/32 -p tcp -m tcp --dport 80 -m comment --comment "See the Oracle-Provided Images section in the Oracle Cloud Infrastructure documentation for security impact of modifying or removing this rule" -j ACCEPT
-A InstanceServices -d 169.254.169.254/32 -p udp -m udp --dport 67 -m comment --comment "See the Oracle-Provided Images section in the Oracle Cloud Infrastructure documentation for security impact of modifying or removing this rule" -j ACCEPT
-A InstanceServices -d 169.254.169.254/32 -p udp -m udp --dport 69 -m comment --comment "See the Oracle-Provided Images section in the Oracle Cloud Infrastructure documentation for security impact of modifying or removing this rule" -j ACCEPT
-A InstanceServices -d 169.254.169.254/32 -p udp --dport 123 -m comment --comment "See the Oracle-Provided Images section in the Oracle Cloud Infrastructure documentation for security impact of modifying or removing this rule" -j ACCEPT
-A InstanceServices -d 169.254.0.0/16 -p tcp -m tcp -m comment --comment "See the Oracle-Provided Images section in the Oracle Cloud Infrastructure documentation for security impact of modifying or removing this rule" -j REJECT --reject-with tcp-reset
-A InstanceServices -d 169.254.0.0/16 -p udp -m udp -m comment --comment "See the Oracle-Provided Images section in the Oracle Cloud Infrastructure documentation for security impact of modifying or removing this rule" -j REJECT --reject-with icmp-port-unreachable
COMMIT
*nat
:PREROUTING ACCEPT [0:0]
:INPUT ACCEPT [0:0]
:OUTPUT ACCEPT [0:0]
:POSTROUTING ACCEPT [0:0]
-A POSTROUTING -s 192.168.42.0/24 -o ens3 -j MASQUERADE
-A POSTROUTING -o ens3 -j MASQUERADE
-A POSTROUTING -o ppp0 -j MASQUERADE
COMMIT
 
Chỉnh sửa lần cuối:
Bên trên